AlmaLinux OS is a free to use and a community-driven Linux operating system created to fill the gap left by the discontinuation of the CentOS Linux stable release. AlmaLinux 8 can be your superlative CentOS 8 replacement for running Production applications. The OS development is funded and supported by CloudLinux, Inc. AlmaLinux 8, being a 1:1 binary compatible fork of Red Hat Enterprise Linux 8, means any application created for RHEL 8 should run without any issues on AlmaLinux 8 base.
In this post we shall look at the installation process of AlmaLinux 8 on Hetzner Root Server. Hetzner is a rock solid Cloud hosting platform with excellent performance. They have a wide variety of Dedicated server offerings for guys looking to host applications on dedicated hardware or to Virtualize. You can get a server that suit your needs in seconds from its Server auctions at very competitive pricing.
I’ll be performing the installation of AlmaLinux 8 on a Hetzner Root Server with below hardware specs:
- CPU: Intel(R) Xeon(R) CPU E3-1275 v5 @ 3.60GHz (Cores 8)
- Memory: 64GB RAM
- Disk: 2 x 512GB NVMe SSDs
- Network Interface: 1Gbit
- IPV4 Address: 1 x IPV4 Public Address
By default, you’re given a single IPv4 public IP address when you order a dedicated server. A request has to be made from the portal after server is provisioned for any additional IP addresses. You’re encouraged to use IPv6 which is free of charge.
Step 1: Activate rescue system
Login to your Hetzner console for Root servers and navigate to Servers section under Main functions.
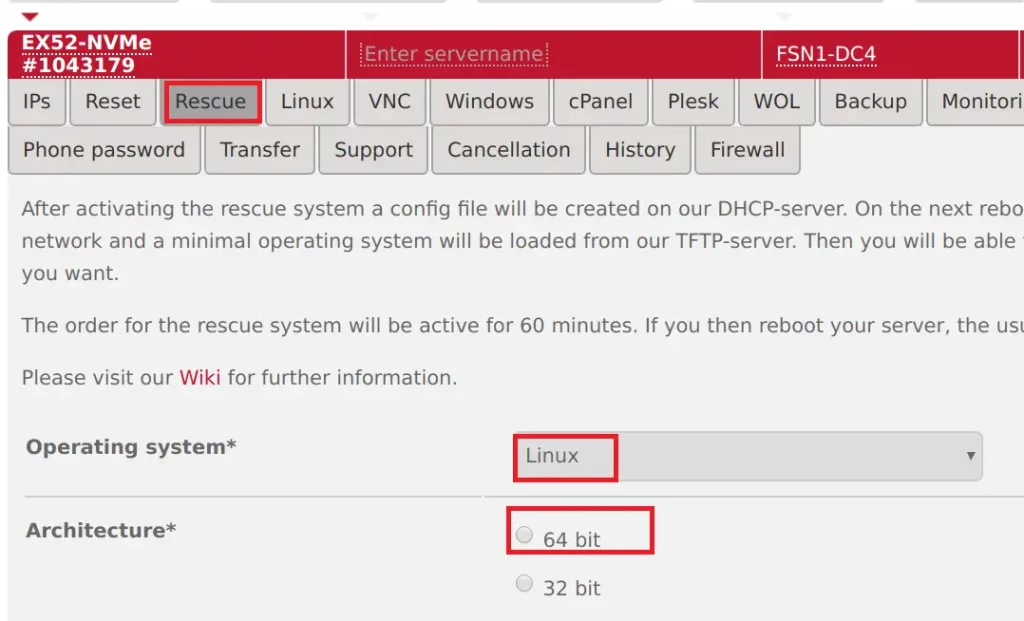
Main functions > Servers > Server Label > Rescue. Then Choose the operating system and CPU architecture for the rescue environment.

If you have SSH public key use it or authenticate with root password. Once done, hit the “Activate rescue system” button.

To reset the server, go to “Reset” menu > “Execute an automatic hardware reset” > “Send“
Step 2: Create Root Server Configuration
SSH to the server in rescue mode using root user and password shown during Rescue activation. If you did enter ssh key, no password is required to access OS shell.
$ ssh root@serverip
Enter passphrase for key '/Users/hoganhost/.ssh/id_rsa':
Linux rescue 5.13.13 #1 SMP Tue Jan 4 06:37:25 UTC 2022 x86_64

----------------------------------------------------------------------

  Welcome to the Hetzner Rescue System.

  This Rescue System is based on Debian GNU/Linux 11 (bullseye) with
  a custom kernel. You can install software as in a normal system.

  To install a new operating system from one of our prebuilt
  images, run 'installimage' and follow the instructions.

  More information at https://docs.hetzner.com/

----------------------------------------------------------------------

Rescue System up since 2022-01-04 19:23 +01:00

Hardware data:

   CPU1: Intel(R) Xeon(R) CPU E3-1275 v5 @ 3.60GHz (Cores 8)
   Memory:  64104 MB
   Disk /dev/nvme0n1: 512 GB (=> 476 GiB) doesn't contain a valid partition table
   Disk /dev/nvme1n1: 512 GB (=> 476 GiB) doesn't contain a valid partition table
   Total capacity 953 GiB with 2 Disks

Network data:
   eth0  LINK: yes
         MAC:  90:1b:0e:be:4c:47
         IP:   89.79.215.215
         IPv6: 2a01:4f8:10a:40d9::2/64
         Intel(R) PRO/1000 Network Driver
root@rescue ~ #
The server we’re using have two disks;
- /dev/nvme0n1
- /dev/nvme1n1
We’ll configure the two disks in a non-redundant RAID 0 (striping) configuration. The OS image to be used is:
root@rescue ~ # ls /root/images/Alma*
/root/images/Alma-85-amd64-base.tar.gz  /root/images/Alma-85-amd64-base.tar.gz.sig
Here are the Hetzner server configuration contents to be used by installimage:
root@rescue ~ # vim  almalinux-install-config.txt
DRIVE1 /dev/nvme0n1
DRIVE2 /dev/nvme1n1
SWRAID 1        # Enable software Raid
SWRAIDLEVEL 0  # Use software raid level 0
BOOTLOADER grub
HOSTNAME myserver.computingforgeeks.com #Server hostname
PART /boot ext3 512M
PART lvm vg0 all #Create LVM Volume group which uses all space

### Customize disk allocations accordingly ###
LV vg0 root / xfs 50G       # /root space allocation
LV vg0 swap swap swap 8G    # swap space allocation
LV vg0 var /var  xfs  100G  # /var space allocation
LV vg0 tmp /tmp  xfs  30G   # /tmp space allocation

IMAGE /root/images/Alma-85-amd64-base.tar.gz
Step 3: Install AlmaLinux 8 on Hetzner Root Server
With the correct server installation configs, you can initiate AlmaLinux 8 deployment on Hetzner root server. Run the commands below:
root@rescue ~ # installimage -a -c almalinux-install-config.txtHere’s the output of a successful installation of AlmaLinux 8 on hetzner root server.
Hetzner Online GmbH - installimage

  Your server will be installed now, this will take some minutes
             You can abort at any time with CTRL+C ...

         :  Reading configuration                           done
         :  Loading image file variables                    done
         :  Loading almalinux specific functions            done
   1/18  :  Deleting partitions                             done
   2/18  :  Test partition size                             done
   3/18  :  Creating partitions and /etc/fstab              done
   4/18  :  Creating software RAID level 0                  done
   5/18  :  Encrypt partitions and create /etc/crypttab     done
   6/18  :  Creating LVM volumes                            done
   7/18  :  Formatting partitions
         :    formatting /dev/md/0 with ext3                done
         :    formatting /dev/vg0/root with xfs             done
         :    formatting /dev/vg0/swap with swap            done
         :    formatting /dev/vg0/tmp with xfs              done
   8/18  :  Mounting partitions                             done
   9/18  :  Sync time via ntp                               done
         :  Importing public key for image validation       done
  10/18  :  Validating image before starting extraction     done
  11/18  :  Extracting image (local)                        done
  12/18  :  Setting up network config                       done
  13/18  :  Executing additional commands
         :    Setting hostname                              done
         :    Generating new SSH keys                       done
         :    Generating mdadm config                       done
         :    Generating ramdisk                            done
         :    Generating ntp config                         done
  14/18  :  Setting up miscellaneous files                  done
  15/18  :  Configuring authentication
         :    Fetching SSH keys                             done
         :    Disabling root password                       done
         :    Disabling SSH root login without password     done
         :    Copying SSH keys                              done
  16/18  :  Installing bootloader grub                      done
  17/18  :  Running some almalinux specific functions       done
  18/18  :  Clearing log files                              done

                  INSTALLATION COMPLETE
   You can now reboot and log in to your new system with the
 same credentials that you used to log into the rescue system.
Reboot the server to use AlmaLinux 8 operating system we just installed:
root@rescue ~ # shutdown -r nowStep 4: UseAlmaLinux 8 on Hetzner Root Server
Login as root user and check OS information:
[root@myserver ~]# cat /etc/os-release
NAME="AlmaLinux"
VERSION="8.5 (Arctic Sphynx)"
ID="almalinux"
ID_LIKE="rhel centos fedora"
VERSION_ID="8.5"
PLATFORM_ID="platform:el8"
PRETTY_NAME="AlmaLinux 8.5 (Arctic Sphynx)"
ANSI_COLOR="0;34"
CPE_NAME="cpe:/o:almalinux:almalinux:8::baseos"
HOME_URL="https://almalinux.org/"
DOCUMENTATION_URL="https://wiki.almalinux.org/"
BUG_REPORT_URL="https://bugs.almalinux.org/"

ALMALINUX_MANTISBT_PROJECT="AlmaLinux-8"
ALMALINUX_MANTISBT_PROJECT_VERSION="8.5"
Perform OS update and installation of basic management packages:
sudo dnf -y update
sudo dnf -y install epel-release vim wget curl bash-completion
We can install neofetch from EPEL repo
sudo dnf -y install neofetchOutput from neofetch command run:

We have successfully installed AlmaLinux 8 on hetzner root / dedicated server. We were able to perform an update and install common management utilities after the installation. In our future articles, we shall cover varying topics around Virtualization and building private cloud server on Hetzner root server(s) powered by AlmaLinux OS. Stay connected for updates.
Check out our cheap and reliable web hosting hoganhost.com.ng


