Does your website need a quality security plugin to guard against cyber-attacks? The Wordfence Security plugin may be exactly what you’re looking for. The Wordfence Security plugin is the most popular security plugin.
Website security should be one of the biggest concerns of any website. Any downtime on your website will directly affect your website’s income and extended downtime could make you lose visitors permanently. Cyber attacks can be prevented by using a security plugin and it takes almost no time to set one up. we will demonstrate how to set up the Wordfence Security plugin in WordPress.
How Can Wordfence Security Protect Your Website
There are many ways you can keep your website protected and they all require a security plugin. Wordfence Security’s rise to the most popular security plugin was no accident. This plugin can protect your website from a wide array of cyberattacks.
Specifically, it protects against hackers, DDoS, and malware. This is accomplished in part by the web application firewall, which can easily track malicious traffic. Its database allows it to identify all of the common malware that invades websites.
One of the best features is that all websites that run Wordfence communicate with each other. This means if website A is attacked by hacker Z, then website B can automatically block hacker Z before he tries anything on another website.
This essentially means the more websites that use Wordfence the better it is for everyone. The number of features and security customization is perfect for any website.
Wordfence Security

Wordfence Security is a powerful and popular plugin that provides a firewall and security scanner. it comes packed with security features and includes the newest firewall rules, malware signatures, and malicious IP addresses it needs to keep your website safe.
Add to that the 2FA and a suite of additional features, and Wordfence becomes one of the most comprehensive WordPress security solutions available today. The plugin includes all sorts of security tools and protects your site on all fronts. It includes:
- WordPress Firewall
- A Security Scanner for WordPress
- Login Security
- Wordfence Central
- Security Tools
Powered by the constantly updated Threat Defense Feed, Wordfence Firewall stops you from getting hacked. Wordfence Scan leverages the same proprietary feed, alerting you quickly about security issues or if your site is compromised. All-in-all, you will be hard-pressed to find a better security plugin for your WordPress website.
How to Setup Wordfence Security
Today I will demonstrate how to set up the Wordfence Security plugin in WordPress. It’s a great plugin that is widely used. Setting up the Wordfence Security plugin is very simple, but there are a few areas you really wanna make sure are running.
Step 1: Install and Activate the Plugin
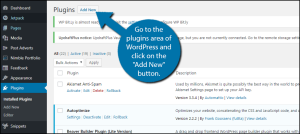
Let’s start by going to the plugins area of WordPress and click on the “Add New” button.
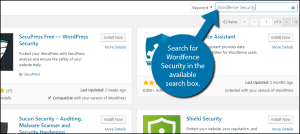
Search for Wordfence Security in the available search box. This will pull up additional plugins that you may find helpful.
Scroll down until you find the Wordfence Security plugin and click the “Install Now” button and activate the plugin for use. Upon activation, you will be asked to submit an email to receive security notifications on, but this is optional. You will also be given the option to take a tour, which will show you all of the features that the plugin offers and where you can edit their settings.

Step 2: Access the Plugin Dashboard
On the left-hand admin panel, click on Wordfence and select the Dashboard option. This will pull up the main settings page of the plugin. All of the information you need to see is on this page including the last scan, malware blocked, IP addresses blocked, etc.
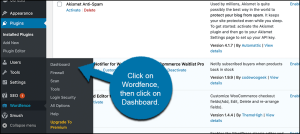
you can see this is now an available option after you have activated the plugin.
Step 3: Configure Dashboard Options
Once you click over to the dashboard area of the plugin, you will see that this is where you can view all sorts of data. You can also set up the global options for the Wordfence plugin. Simply click on the “Global Options” tab to open them up.
Step 4: Setting up two-factor authentication
Wordfence comes with the ability to set up two-factor authentication for extra login security. Click on the “Login Security” link. Once on the page, you can see that there are a couple of options you can set up and out two-factor authentication in-place if you want.
Enabling two-factor authentication, or 2FA, is one of the most important steps you can take to prevent account compromise. Two-factor authentication is one of the most secure forms of remote system authentication.
Most TOTP (Time based One Time Password) based authenticator apps should work with Wordfence two-factor authentication. We have tested the following apps available for Android, iOS and Windows devices, which worked at the time they were tested:
- Google Authenticator
- Authy
- FreeOTP
- LastPass Authenticator
- Duo Mobile
- Microsoft Authenticator
Note: we will recommend you to use Google Authenticator, kindly download the Google Authenticator on your mobile device.
First-time setup
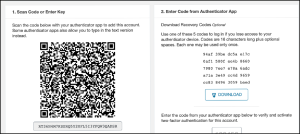
The first time you sign in to use Wordfence plugin, you will be prompted to enable 2FA. If you click “Setup Two Factor Authentication” then a window will pop up with a QR code (Quick Response Code). You can scan this code with the app which you downloaded on your device, the Google Authenticator app.
Once you have done this, be sure to click the “Download” button to download the backup codes so that you can sign in to your account, even if you lose your smartphone.
Click “Continue” to be taken to the next screen and enter the 6-digit code that appears in your authenticator app and then click “Activate”.
Do you need reliable cheap web hosting visit hoganhost.com.ng


