Now-a-days Brute force attacks to servers/websites are frequent. Brute force attack is generally a password guessing technique. It is a type of attack in which trying every possible combination of characters or data in order to find the decrypted message. A brute force guarantees finding the key – it’s trying every possible combination and does not rely on any potentially incomplete dictionaries or lists of possible keys.
cPHulk Brute force Protection is an inbuilt protection used in WHM for preventing brute force attack. cPHulk Brute force Protection will detect and will block continuous failed login IP address.
cPHulk is a brute force protection system developed by the cPanel team and is exclusive to cPanel / WHM control panels. It has been integrated with cPanel version 11. With cPHulk, you can set a threshold for authentication attempts on services like POP3, cPanel, WHM, FTP, etc. After a certain amount of attempts, the attacker will no longer be able to authenticate
We can enable/disable cPhulk via WHM and command line.
1] Steps to enable cPHulk via WHM
Enabling cPHulk is pretty easy. Simply log into your WHM control panel as root. From the main menu on the left, click on Security Center from the Security section. When youre done, simply click on the Enable button at the top.
Click on the cPHulk Brute Force Detection link at the top of the page. Now you may want to configure cPHulk before you enable it. The configuration parameters are pretty much self-explanatory. Basically you set the number of failed attempts before an IP or an account is blocked and you set how long you want it to be blocked.
>> Login to WHM.
>> Navigate to Home -> Security Center -> cPHulk Brute Force Protection.
> Click the toggle ON/OFF option to enable or disable the cPHulk.
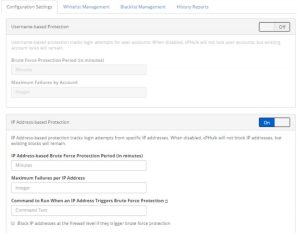
Configuration settings
We can configure cPHulk settings in WHM as per the image below. We can change limits of failed login attempts and temporary blocks duration using this tab.
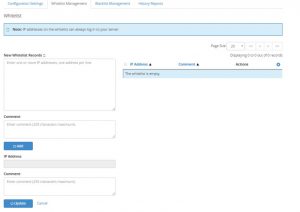
Whitelist Management
We can also whitelist an IP address from cPHulk interface. The whitelist specified IP address for which cPHulk always allows login to our server.We can enter the IP address in the New Whitelist Records field and click the Add button. We can add desired comments in the comment text box. These comments will help you for quick reference. When clicking on the whitelist management tab you will get a screen that looks like the picture below.
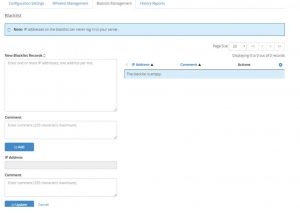
Blacklist Management
Blacklist management is opposite of the whitelist tab. This tab help you to block specific IP address and ranges.If you found repeated failed attempts to login your server from an unauthorized IP address you can add it to your blacklist to prevent any future attempts.
We can remove the blocked IP address by clicking the Delete button to the right of the IP address
History Reports
The History Reports tab shows all the failed attempts to access our server. We can clear the log details using this tab and it will release any current lock outs.
- Steps to enable cPHulk via Command line
cPHulk status
To check the cPHulk status , run this command :
# ps aux | grep –i cphulk
Output :
root 8196 0.0 0.2 41088 2120 ? S Feb05 2:38 cPhulkd – processor
This output shows that cPHulk is enabled.
Restart cPHulk
To restart cPHulk daemon, perform either one of the commands.
Perform a soft restart.
# /scripts/restartsrv_cphulkd
Perform a hard restart and force the system to flush the daemon’s memory.
# /scripts/restartsrv_cphulkd –stop; /scripts/restartsrv_cphulkd –start
Disable cPHulk
To disable cPHulk
# /usr/local/cpanel/etc/init/stopcphulkd
Or
# /usr/local/cpanel/bin/cphulk_pam_ctl –disable
To disable cPHulk to keep it offline, even after a restart of cPanel &WHM, remove the cPHulk touch file with the following command:
# rm /var/cpanel/hulkd/enabled
Enable cPHulk
To enable cPHulk
# /usr/local/cpanel/etc/init/startcphulkd
Or
# /usr/local/cpanel/bin/cphulk_pam_ctl –enable
IP address Management via command line
Add IP address to whitelist
To add IP addresses to the whitelist from the command line, run this command /scripts/cphulkdwhitelist IP where IP shows the IP address that you wish to whitelist.
# /scripts/cphulkdwhitelist x.x.x.x (Note: x.x.x.x denotes your IP address)
Add IP address to Blacklist
We can also use the command /scripts/cphulkdblacklist IP for blacklisting an IP address in cphulk.
# /scripts/cphulkdblacklist x.x.x.x
IP address management via MYSQL
cPHulk stores all of its information in a database called cphulkd. There are two tables of interest: ”logins” and “brutes”.The logins table stores login authentication failure.The brutes table stores excessive authentication failures indicative of a brute force attack.
Whitelisting through MySQL prompt
>> Login to your server via SSH as the root user and run the following commands.
>> mysql
To access the cPHulk database
>> use cphulkd
To show the list of tables under cPHulk’s database.
>> show tables;
To check if your IP address is in brutes tables.
>> select * from brutes where IP =’X.X.X.X’; (Note: X.X.X.X represents your IP address)
If IP address found in brutes table, then remove the IP address using the following command.
>> delete from brutes where IP =’X.X.X.X’;
Or we can delete the IP address from logins table
>> delete from logins where IP = ‘X.X.X.X’;
>>exit
cPHulk Log files
The log files are first contributor on all the IT environment when we troubleshooting the problem. The cPHulk log file are located under /usr/local/cpanel/logs/ directory and you can use less, cat, more or tail command to check the logs messages.
These are the log files of cPHulk Brute Force Protection :
>> /usr/local/cpanel/logs/cphulkd.log
> /usr/local/cpanel/logs/cphulkd_errors.log
If you require help, contact HoganHost.com.ng


![How to Install cPanel on CentOS 7 [step-by-step 2021guide]](https://hoganhost.com.ng/blog/wp-content/uploads/2021/01/Install-cPanel-1024x536-1.png)


